Sterling Home Inspections
  • Home
  • About
  • Services
    • Inspection Overview
    • Your Report
    • For Agents
  • Testimonials
  • Blog
  • Helpful Info
  • Schedule a Home Inspection
  • Click to open the search input field Click to open the search input field Search
  • Menu Menu

Tag Archive for: Home Inspection

Home Inspection, Real Estate, Uncategorized

Is My Range In Danger Of Tipping Over?

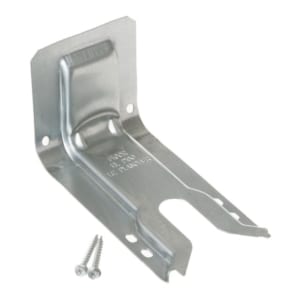
The answer is it might be if its not properly fastened in place.  Say what now? I didn’t know my range needed to be fastened in place.  Unfortunately, in most cases neither did the installer.  Anti-Tip brackets come with every range, but most are thrown away without being installed.  But don’t worry if your range doesn’t have them, it’s a simple fix.  this can be done without much trouble by installing an ‘anti-tip’ bracket behind the range.  Often times your home inspector will check to see if one is installed. Below is a picture of a typical slide in range anti-tip bracket.

Anti-Tip Bracket for GE Range

WHAT IS AN “ANTI-TIP” BRACKET ANYWAY?

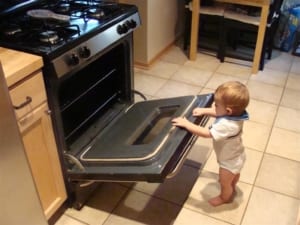
An anti-tip bracket is a small clip that attaches to the wall or floor behind the range and prevents it from tipping over.    According to the Consumer Product Safety Commission (CPSC) there were around 38 fatalities associated with ranges tipping over in the years between 1980 and 2008, and far more injuries in addition to that number.  The fatalities were divided among children between one and 5 years old and elderly adults using the open range door for support.  If the range tilts forward and hot water or oil falls onto a child, it could be a disaster.  One of my friends had this happen to him with bacon grease and I don’t want to see it happen to anyone else.  In response to this danger, the American National Standards Institute (ANSI) and Underwriters Laboratories (UL) created standards in 1991 that require all ranges manufactured after that year to be capable of remaining stable while supporting 250 pounds of weight on their open doors. Manufacturers’ instructions, too, require that anti-tip brackets provided be installed.

Child at Range

IS AN “ANTI-TIP” BRACKET REQUIRED?

While anti-tip brackets are not referenced directly in the building code they are required by the manufacturer.  The building code states “General. Equipment and appliances shall be installed as required by the terms of their approval, in accordance with the conditions of the listing, the manufacturer’s installation instructions and this code”.  In other words, if the manufacturer has recommended it as part of their installation, then it must be installed.


HOW DO I KNOW IF ONE IS INSTALLED ON MY RANGE?

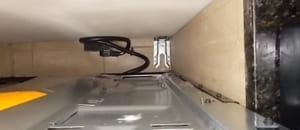
You might be able to see the bracket by looking behind the range with a flashlight, but some floor mounted brackets are hard to see from this angle.  Some ranges have removable drawers or as space between the range and the floor that will make it possible to see if one is installed.   The other way to test if one is installed is to carefully tip the range forward. It will only tip forward slightly if the range is properly secured in place. Make sure to remove everything from on top and inside the range before you attempt this.  There are many different types of ranges, but as far as I know all of them require an anti-tip bracket.  Different ranges have different brackets so look for one by make and model number of your range.

Range Anti Tip Bracket Installed

I DON’T HAVE ONE – WHAT SHOULD I DO NOW?

Anti-tip brackets are available from the manufacturer, big box stores, online and sometimes at appliance stores.  They only cost a few dollars and simply get screwed in place.  The range does need to be moved out of the way to do this, so make sure if you are doing this yourself you have an assistant and also make sure to protect your floors from damage because stoves are heavy and can easily damage wood floors.

Additional Resources:

Range Tip over Safety Alert

CPSC Tip over Report

CPSC Free Standing Ranges

December 27, 2018/0 Comments/by alansinger
https://www.sterlinghomeinspections.com/wp-content/uploads/sites/57/2018/12/Anti-Tip.jpg 225 295 alansinger https://d3bfc4j9p6ef23.cloudfront.net/wp-content/uploads/sites/57/2018/11/07195401/logodark.png alansinger2018-12-27 17:45:312023-12-29 18:21:29Is My Range In Danger Of Tipping Over?
Uncategorized

So You’re Having Your Home Inspected – How to Prepare

One of the steps in the home selling process is having your home inspected by someone the seller has chosen.  The Home inspection is important to both the buyer and the seller, but to the seller it represents another hurdle to getting the contracts signed.   As an inspector I take people on tours of the homes they are planning on buying and talk them through the inspection process, showing them the good, the bad and the really bad.  One of the things that I see on a regular basis is how little many sellers do to prepare for that inspection.  Some sellers just assume that there is nothing they can do to alter the outcome of the inspection, that’s where they are wrong.   Following a few simple steps like those listed below can change the way an inspection occurs and possibly even shorten the number of items on the inspection report.

1. Clean the House

Clutter

This sounds so simple yet homeowners often overlook this tactic. Home inspectors are people first and inspectors second. As people, they carry preconceived ideas of how well a home has been maintained. Clean homes say you care and take care of the house.

2. Be on Time Because the Inspector Will Be

Sometimes home inspectors are early. If an inspector makes an appointment with you for 9:00 a.m., have the house ready for inspection at 9:00 a.m. It’s also common for inspectors to start on the exterior of the home, so leave the shades down or drapes drawn until you are dressed. More than one unprepared seller has been “surprised” by a stranger stomping around in the back yard.

3. Leave the Utilities Connected

The home inspector will need to turn on the stove, run the dishwasher, test the furnace and air conditioning, so leave the utilities on, especially if the house is vacant. It’s impossible to check receptacles for grounding and reverse polarity if the power is turned off. Without utilities, the inspector will have to reschedule, which could delay the closing of your transaction and the removal of the buyer’s home inspection contingency.

4. Provide Workspace Around Furnace and Water Heaters

Remove boxes, bookcases, furniture and anything else blocking access to your furnace, air conditioner and water heater. The inspector will need three to four feet of working space to inspect these items.

5. Keep Pilot Lights Ignited

Many home inspectors will refuse to light pilot lights because they are not covered for that type of liability. If your pilot lights are not lit, then important items such as the water heater, gas stove or furnace will not be inspected, and the buyer could delay closing until those inspections are completed.

6. Provide Access to Attic and Garage

The inspector will need to get into your basement and / or attic as well, so keep a path cleared. Move boxes away from the walls. Vacuum spider webs.

7. Leave Keys for Outbuildings & Electrical Boxes

Leave the remote controls for your garage door opener or a key if the garage is unattached to the house. Unlock the covers for your sprinkler system and electrical box. Leave a key for exterior building access.

8. Clear Away Brush from Exterior Inspection PointsPelhamNYHomeInspection

Nobody expects you to shovel a tunnel around your home if snow drifts are blocking the foundation but, in the winter, do provide a path around the house. In the summer, cut down dead tree branches and clear brush from the foundation. Move trash cans away from the house.

9. Prepare to be Away for Three Hours Minimum

Often the buyer will accompany the home inspector, and buyers feel uncomfortable asking questions if the owner is present. Try to schedule a time for the inspection when you can be out of the house and take the children with you. Crate your pets if you cannot remove them from the premises.


10.  Take Care of Your Pets

Pets Escaping in White Plains NY

Consider removing any dogs in the home and leave a note about any other pets present. Don’t assume that the inspector or buyer will be OK with your dog. Consider taking them with you during the inspection or placing them in a kennel or secured area of the home. If cats or other pets are present, ensure the inspector knows this so they are not let out of the home.

11 Replace Any Burned Out Light bulbs

The inspector won’t know if the bulb is burned out, or if the switch or fixture is bad. A fresh bulb where needed will eliminate this question and help the inspection go smoother.

12. Consider Having a Pre-Listing Inspection

Consider having a pre-listing inspection. If you have further concerns about the condition of the home and the major systems, consider having a pre-listing inspection done. The inspector can point out any repair concerns, providing you with the opportunity to repair items in advance, and further prepare your home for a buyer’s inspection.  Oftentimes items uncovered during an inspection, such as mold, could have been remedied before the inspection eliminating a lot of concern and extra back and forth negotiations.  Sometimes being able to disclose upfront that the boiler or furnace are old, or you know that the roof is in need of repair means not having to re-visit the issues after the inspection.    Sterling Home Inspections can help assist you with Pre-Listing Inspections and perhaps help make the selling process a bit easier.

November 9, 2014/4 Comments/by alansinger
https://www.sterlinghomeinspections.com/wp-content/uploads/sites/57/2018/11/BedfordNYHomeInspectionClutter1.jpg 333 500 alansinger https://d3bfc4j9p6ef23.cloudfront.net/wp-content/uploads/sites/57/2018/11/07195401/logodark.png alansinger2014-11-09 20:25:422021-12-29 22:51:25So You’re Having Your Home Inspected – How to Prepare
Uncategorized

Why is My Water Heater Leaking?

Have you taken a look at your water heater recently? They typically sit in our basements, and we really don’t think about them for years until one day you find them leaking, or worse, spilling gallons of water on the floor. There are a few maintenance tips I give home buyers during an inspection that I’d like to share and also some general inspection tips you can do every so often to try to avoid having gallons of water spilled on your floor.

First off, the maintenance tips. I always like to show homebuyers the Temperature Pressure Relief (TPR) valve. This is one of the major safety features on a water heater. You’ll usually find it on the side of the tank, sometimes on top. It should have a pipe attached to it that runs down the side of the tank and stops short of the ground (it should terminate within 6” of the ground). The TPR valve is
meant to release before the temperature gets too high or pressure builds up too much to the point where the tank would explode (do a Google search for some cool video).

Water+Heater+Discharge+Valve

It should be tested once or twice a year. It’s pretty easy – just put a bucket at the base of the discharge pipe, lift up the lever on the TPR valve, let some water run out and release the lever back down. If you don’t get any water or it continues to drip after it’s drained, it’s time to have the TPR valve replaced.

While you’re testing the TPR valve, take a look at the discharge pipe. First off, there should be one. If there isn’t one (see pic), it’s a safety hazard if that valve were to release. Next, there should not be a cap on the end of it (that would defeat the purpose). And the end of the pipe shouldn’t be threaded (to keep people from capping it). It should terminate within 6” from the ground.

From a maintenance standpoint, the other thing you can do is drain some water out of the bottom of the tank once a year or so to flush and sediment out of the base of the tank. If you’ve got an older water heater and you’ve never done it, it might not be worth trying to start doing it now. But if your water heater is only a few years old, it’s a yearly task that should get you more life out of the water heater.

To do this, connect a short hose to the drain valve at the base of the water heater and run it to the main floor drain, laundry sink, bathtub or even outside. Shut-off the cold-water supply to the water heater (there should be a shutoff valve on the cold water piping just above the tank) and/or the electricity running to the water heater. Open a hot water faucet (maybe at the laundry sink if that’s nearby). And open the drain valve. Watch the water coming out, you might find that you have to turn the cold-water supply on and off to help flush the sediment out of the base of the tank. There’s a great video on how to do this here:

http://www.thisoldhouse.com/toh/video/0,,20047191,00.html

That’s if from a maintenance standpoint. It’s also good to visually inspect your water heater a couple of times a year. First take a look at that discharge pipe connected to the TPR valve. Is there water dripping from it? If so, the TPR valve likely needs replacement. Next take a look at the top of the tank. Are combustible materials (like pipe insulation) cleared at least 12” from the top of the tank? Take a look at the cold (and maybe hot) water supply shut-off valves. Do they look corroded? Might be time to have a plumber out to replace them.

If you’ve got a gas water heater, take a look around the draft hood area at the top of the tank. Take note if there are a lot of rust flakes in this area. It could be an indication the water heater is having problems drafting or not combusting properly. Take a look at the flue pipes. Are they connected with at least three metal screws at each connection? Does it pitch upwards at least a ¼” per foot? If there are too many bends in the flue pipe that might be why it’s not drafting properly. Might be time to call in an expert for further evaluation.

Rust in water heater burner chamber

You can also take a look inside the burner chamber of gas-fired water heaters. Rust flakes and corrosion are an indication the water heater’s getting old. If there are a lot of rust flakes, it might be time to consider replacement. Look at the base of the tank while you’re down here. See any water? If so, the tank is probably ready to dump. Make sure you keep combustibles away from this area and it’s not blocked so the water heater can get the proper amount of air it needs to combust properly.

Let the hot water run at a faucet and listen to the water heater as it’s heating up water. Is the tank making noise? I’ve had some water
heaters that sound like they’re making popcorn inside the tank. The sound is the sediment in the bottom of the tank bouncing around as it’s heated up.

So, take some time to take a look at your water heater. Keep in mind
that the typical service life for water heaters is 10-12 years. That’s just the average. I’ve had people tell me their water heater dumped out at eight years. But with a little maintenance, you can get plenty of life out of them.

November 7, 2013/4 Comments/by alansinger
https://www.sterlinghomeinspections.com/wp-content/uploads/sites/57/2013/11/Water Heater Discharge Valve.jpg 180 240 alansinger https://d3bfc4j9p6ef23.cloudfront.net/wp-content/uploads/sites/57/2018/11/07195401/logodark.png alansinger2013-11-07 00:23:422021-12-29 22:14:06Why is My Water Heater Leaking?
Uncategorized

Holmes Inspections: Don’t Believe Everything You See On TV

There’s a show on HGTV called Holmes Inspection, which exposes problems with houses that were allegedly missed by other home inspectors. Here’s the basic formula: Frank and Fran buy a house, have it inspected, no major problems. Time passes, problems show up, Mike Holmes gets called in. Mike inspects the house, agrees there’s a problem, tears everything open to show what was done wrong or could have been done better, and then says he’ll “make it right”. In the end, the original home inspector gets blamed for missing defects with the house.

I’ve had countless clients ask me about the show, and I’ve heard a lot of discussion about the show from other home inspectors, so I finally took the time to watch an episode to see what all the talk was about.

Holmes Inspection makes for great TV. I watched an episode titled Frigid Floor, wherein the homeowners complained about a cold floor at the addition of their house. There were a couple of other miscellaneous issues, but the big one was the cold floor. Mike Holmes doesn’t know exactly what the problem is, so he has his crew come in and cut out a huge section of the kitchen floor to get at the crawl space below. There is no final diagnosis of what the problem is, but his crew spares no expense in making it right.

Floor Being Opened Up

They tear out all of the cabinets, countertops, flooring, and subfloor to get at the crawl space. They spend three days hand digging the crawl space to make it several feet deeper, install rigid foam on the floor, pour self-leveling concrete on the floor, then have the walls insulated with spray foam (I loved that part). While they’re at it, they also beef up the floor structure. They add access to the crawl space from inside the basement by cutting an opening through the foundation wall, and they add a heat register and a light. They definitely ‘make it right’.

The original contractor who did the addition gets thrown under the bus; Mike says that this is how the job should have been done to start with. While Mike’s work was far superior to that of the original contractor, I think it’s unfair to put down the original contractor. The work was done for the previous owner, permits were pulled, and the work was inspected and approved. We have no idea of what was agreed upon between the original contractor and the previous owners. Maybe the original contractor gave the previous owners a bid to do exactly what Mike Holmes did, and the owners opted to save $10k by only doing the bare minimum.

If the previous owners got three different bids for the job, there’s a slim chance that the contractor who gave them a bid on a beautiful crawl space would actually get the job.

The original home inspector gets thrown under the bus as well. Mike concludes the show by saying that if the original home inspector actually knew something about construction, he would have warned the buyers that there was no crawl space. That comment really bugged me. The home did have a crawl space, it just
didn’t have any access, and it was too small for most people to actually crawl in to; that doesn’t mean it’s not a crawl space. I’d love to
know what Mike would have said to the buyers if he had done the original home inspection. Here are a few potential warnings:

  • This home has no accessible crawl space. So what?
  • This home has no accessible crawl space, but it should. I can’t inspect what I can’t see. Before you buy this house, you should have the sellers make the crawl space accessible and have it inspected. The home inspection was performed in warm weather, and there were no signs of any problems. The work was done with permits and inspected, so what would actually happen if the buyers demanded the crawl space be made accessible for the inspection? Do you think the sellers would agree to that? My experience tells me absolutely not.
  • This home has no accessible crawl space. I know that permits were pulled for the addition and inspected by the city, but I don’t care. If I can’t see it, it’s probably not right. Don’t buy this house. Ha! Now I’m just being silly… I think.

Just for the sake of argument, let’s say the inspection was done during the winter, the floor was cold, and the crawl space was barely accessible. What would the recommendation have been? Gut the kitchen and make it right? That suggestion would go over like a lead balloon.
Personally, I would have told the buyers that the floor was cold, and to fix it would probably be cost prohibitive. This is what you’re getting, take it or leave it.

My conclusion

I’m not trying to be too critical of the show, but the repairs performed on this house were completely over-the-top and unrealistic.
Don’t get me wrong, it’s a very cool concept for a show – take a problem with a house that is cost prohibitive to repair and fix it any way you want with time and money being no object. It would have been nice to do it this way from the start, sure… but I can’t imagine any sane person spending their own money gutting a kitchen just to make the floor warmer. This is a fun show to watch as long as you remember that it’s just TV. I think the main messages are good: hire an excellent home inspector and don’t skimp out on your remodel project. You’ll save money in the long run by spending a little more up front.

September 14, 2013/3 Comments/by alansinger
https://www.sterlinghomeinspections.com/wp-content/uploads/sites/57/2018/11/CuttingOpenTheKitchenFloor.jpg 139 250 alansinger https://d3bfc4j9p6ef23.cloudfront.net/wp-content/uploads/sites/57/2018/11/07195401/logodark.png alansinger2013-09-14 12:26:362021-12-29 22:08:10Holmes Inspections: Don’t Believe Everything You See On TV

Recent Posts

  • Is My Range In Danger Of Tipping Over?
  • Realtor.com writer taps Sterling Home Inspections for input on article about “7 Things Your Home Inspector Wishes You Knew”.
  • 7 Things Your Inspector Wishes you Knew
  • So You’re Having Your Home Inspected – How to Prepare
  • Sterling Home Inspections New Promotional Video

Instagram

Follow Me!

Proudly Providing Home Inspection Services

Sterling Home Inspections offers Pre-listing Inspections,  Construction Phase Inspections, New Home Inspections, Water Quality Testing, Radon Testing and Termite Inspections in Westchester County NY and Fairfield County Connecticut

Schedule Inspection Service Areas

THE VERY BEST FOR YOUR HOME – STERLING HOME INSPECTIONS

alan@sterlinghomeinspections.com

(914) 413-7781

22 Oxford Road, White Plains NY 10605

NY State Home Inspection License # 16000058241 | CT State License # 000756 | NY DEC Pest Control License # T3883064

ARMONK, BEDFORD, RYE, LARCHMONT, SCARSDALE, KATONAH, POUND RIDGE, TARRYTOWN, IRVINGTON, NEW ROCHELLE IN WESTCHESTER NEW YORK.
GREENWICH, STAMFORD, WESTPORT, DARIEN, NEW CANNAN, FAIRFIELD AND WILTON IN FAIRFIELD CONNECTICUT.

STERLING HOME INSPECTIONS IS A FEATURED INSPECTOR AT:


© Copyright Sterling Home Inspections - Website by Spectora
  • Link to X
  • Link to LinkedIn
  • Link to Facebook
  • Link to Instagram
  • Link to Yelp
  • Link to Youtube
  • For Agents
  • Contact
  • Service Area
  • Video Page
  • Your Report
Scroll to top Scroll to top Scroll to top