Ice Dams – Can They Be Prevented?

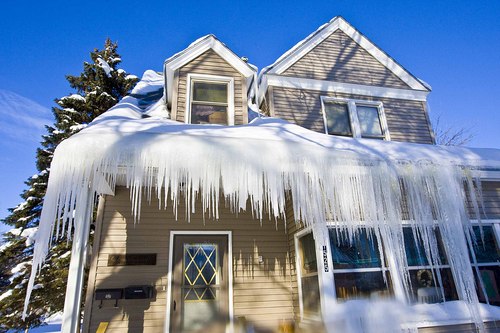
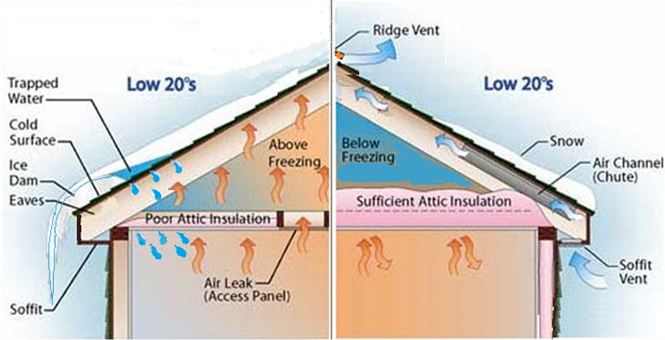
During snowy winters, many northern homes are plagued by ice dams. If your house suffers from wet ceilings during the winter, you may be ready to call up a contractor. Be careful, though: since most contractors don’t understand the causes of ice dams, they often suggest the wrong solution. Ice dams form when a home’s escaping heat warms the roof sheathing and melts the underside of the snow layer on the roof. Water trickles down the roof until it reaches the cold roofing over the eaves, where it freezes. After a while, the ice at the eaves gets thicker and thicker, forming an ice dam. Eventually, water backs up behind the ice dam. If the water reservoir is large enough, it can back up under the roof shingles and damage ceilings.
The four possible solutions to ice damming are:
- Sealing air leaks between the warm interior and the attic or cathedral ceiling.
- Adding more ceiling insulation.
- Improving ventilation between the top of the insulation and the roof sheathing.
- Installing a rubberized membrane under the roofing.
While the first two of these solutions can reduce or eliminate the problem, the last two solutions are the equivalent of waving a white flag and admitting defeat.
Step one: seal the air leaks
Most ice dams are caused by flaws in a home’s air barrier. If escaping indoor air finds its way to the underside of the roof sheathing during the winter, the heated air raises the temperature of the sheathing. That’s bad.
Step two: check your insulation level
Once you’ve plugged your air leaks, check your insulation levels. The latest version of the
International Residential Code requires R-49 ceiling insulation in New York.
In these areas, ceilings need a minimum of 14 inches of fiberglass batts, cellulose, or open-cell spray foam. If you’re using blown-in fiberglass, you’ll need about 20 inches to achieve R-49.
Two more points about attic insulation:
Attic insulation must completely cover the top plates of a home’s exterior walls.
Code insulation requirements represent the legal minimum. Most green builders choose to exceed these minimum requirements.
Step three: improve ventilation between the insulation and the roof sheathing
Once you’ve done your best with steps 1 and 2, it’s worth considering step 3: ventilation.
In the world of ice-dam prevention, ventilation is capitulation. By recommending ventilation, a
builder is saying, “I wasn’t able to include enough insulation to prevent the roof sheathing from being warmed by escaping building heat. So, I guess I’ll use another method to cool the roof — I’ll ventilate the underside of the roof with exterior air.” Although it is an admission of failure, this type of roof ventilation often makes sense. It’s a kind of insurance.
When using roof ventilation to address ice dams, remember: Ventilation should always be the third, not the first, weapon in your arsenal. Distrust any expert who advises using ventilation as the first step toward solving an ice dam problem. If ventilation channels are improved without any attempt to perform air sealing work, ventilation improvements can make an ice dam problem worse or increase a home’s fuel bills. (By depressurizing an attic, an effective ridge vent often increases air leakage through the ceiling, bringing more heat than ever against the roof sheathing.) The best ventilation channels include a balance of soffit vents and ridge vents. Attics do not need gable vents. In a cathedral ceiling, provide an air barrier between the top of the insulation and the ventilation channel. Site-built ventilation chutes (foamed or caulked in place) are far preferable to polystyrene Proper-Vents.
Step four: cover your roof sheathing with rubberized membrane underlayment
There are lots of roofers out there with a sure-fire cure for ice dam problems: just cover your entire
roof with Ice & Water Shield. Run, don’t walk, away from such a roofer. These are the guys who have completely thrown in the towel. They have no plan to seal air leaks into your attic. They have no plan to improve your insulation level. They’ve given up on ventilation. In fact, they have no plan whatsoever to prevent ice dams. This is what they’re saying: “Yup, your roof is going to get an ice dam. Maybe a big one. We can’t plug your energy leak, so we’ll just let the ice dam develop. The Ice & Water Shield will probably keep your ceiling dry.” That said, Ice & Water Shield is relatively cheap insurance. Used properly — extending from your eaves to a point that is 3 feet higher than the plane of your exterior wall — Ice & Water Shield will Prevent Ice Dams with Air Sealing and Insulation to limit damage from ice dams that form due to unusual weather conditions or some idiot who disturbed your attic insulation. But remember ventilation and rubberized membranes should be the last weapons in your arsenal.


Leave a Reply
Want to join the discussion?Feel free to contribute!